White Wings Super Paper and Wood Gliders
When I lived in Germany at the young age of 10 years old, my father bought me the following glider kit:

The kit itself is no longer sold, but they do have some Sky Cubs at www.whitewings.com. I purchased the same kit my father got me so many years ago off of eBay for around 12 dollars.
It was designed by a Japanese Aerospace Engineer who had a Ph.D and won a world competition with his air planes. His name is Dr. Yasuaki Ninomiya. One day I determined I was going to build his ‘Falcon 509’. It had an upside down rudder of all things which I thought was pretty neat. Little did I know that it flew excellently as well. To show how well it flew I share the following story. We lived on the third floor of a three story apartment building on Ramstein Air Force Base in Germany. I can’t remember if I used the slingshot or if I launched it off the balcony. Either way it started doing the circling that I had trimmed it for. I had my bike and was timing it. It must have caught a thermal because it circled and started slowly going down the street towards the park. It flew for just over ten minutes until it ended up in a tree. I tried to get it down, but could not. I came back later and it was no where to be found. It was the longest flight I have ever had with a paper airplane.
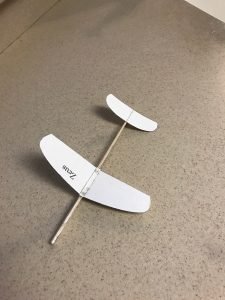
I have wanted to design my own for a long, long time. In his book he has a couple of neat equations, and I figured it would just be fun. I designed the Zeus.
- The rudder is upside down, this get’s rid of the turbulence effect on it from the wings. It results in a much smoother flight.
- The dihedral is excessive as seen in the pictures. It should only be 30 degrees at most, but I find a 40 degree angle results in much more stable flights.
- The fuselage is really skinny in the back, which is not a good thing. Have to be careful not to break it. It had to be this way to keep the center of gravity where it needs to be. If you want to make it a bit thicker you can, but then you’ll need to use some clay or a paper clip on the front to make the center of gravity in the right position.
This is the PDF of the design available for download:
Assembly instructions:
Print off the plans on 110lb to 140lb paper. It jams my printer unless I use the special feeder slot, so be careful. Otherwise you’ll have to print and trace them only 110lb to 140lb paper. The white wings kit above uses 140lb paper I believe, but I use 110lb paper just fine.

- Thickness: 110 lb. Cover (300 GSM)
- Dimension: 8.5 x 11 inches (216 x 279 mm)
- Color: White
I use ‘Duco Cement’ available at Ace Hardware for gluing. It is the best glue I have found, the others don’t dry fast enough, or are so wet (Elmers) that they soak the paper. Have to use a non-water based glue. Be careful to glue in a well ventilated area to avoid the fumes!

- Multi-purpose, fast-drying, nitrocellulose household cement
- Dries fast, clear and tough; easy to apply and water resistant
- Special cap prevents clogging and drying out
I like to use 1/8 inch balsa for the fuselage, but if it is not available you can just make 3-5 copies of the fuselage and glue them together.
The rudder is the hardest part, there are three pieces. In reality you only need the biggest one, but if you want extra support for the elevator you can add the middle sized one, and if you want more support for the rudder you can add the smallest one. Remember to fold the small boxes on the top over to form a small flat area for the elevalator to attach to.
Remember to camber the wings, by gently curling them into the shape of a real wing like on aircraft, this makes a huge difference in the flying characteristics of the plane.
Good luck!


Filed under: Uncategorized - @ June 5, 2025 9:48 pm